Boeing 737-200 Tutorial.
Wings.
I start with the wings.
The front wings are in two parts, the back wings are in one piece.
First cut the wings from the sprue.


As you can see there are some plastic parts witch stay on the piece.

Also there are some parts who aren't smooth on the tip of the wing.


Here i use the scalpel, it's easy to use and you can cut
as much as needed.
This is the result after cutting.


Now they are done, it is time to glue them together.
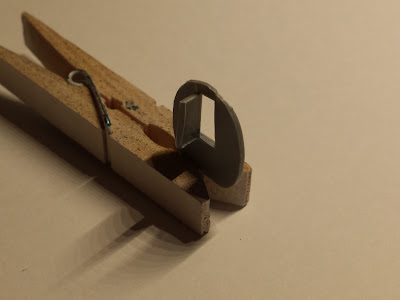
This is what i use.

The glue from Revell and some clothespins.

Make sure that the 2 parts are in one line so you don't see a different
between the 2 parts.
Use the clothespins to hold the pieces together for a good fixing.

The back wings are also attached on the sprue, here i also use my nail clipper
to make them lose and to remove the two extra pieces.
Then smooth out the piece with the scalpel.

This is how they look after cutting.

On the plan you can see that there are 2 extra parts under need the front wings.
Those are the flap hinge fairings.

To cut the pieces 39 - 40 - 41 and 42, i use the nail clipper.


I didn't only use the scalpel this time. Because there is an extra line that has
to be removed. This is why i use the nail fail to smooth out the pieces.
You can see the before and after on the picture.

When the pieces are done, i use the glue to put them in place.

The pieces are in place. Here you can see the wing in top and under.
The two engines.
One engine consists of 4 pieces, shown on the plan.


Again i use my nail clipper to cut the pieces of the sprue, and this time
i use my scalpel and my nail fail to smooth out the pieces.


The engine blades are done. Now the engine caps.


The pieces are now done and ready to glue them together.

Because the 2 caps are going to be glued together, there is not
enough space between them to paint them.
So i do this before gluing.

Using a small brush from Revell and aluminum paint.


The middel section doesn't need to be done because you won't see it.
REMEMBER !!
Try not to paint the connection parts,
because the glue won't stick on the piece if there is paint on it. If it would be
the case, then you better use some sandpaper to softly clean them.

When the pieces are painted you can glue them together.
Also using the Revell glue and some clothespins for fixing.


The two engines are done and ready to assemble them on the wings.
The fuselage
Here starts the real challenge. I have to make a extra piece that will
divide the interior in two.
The passenger area and the cargo area.
The passenger area will be with white light and the cargo area with red lights.
Also i have to see witch doors have to be open, and how the cargo area looks like.
I was searching on the web for some answers.
This is what i found.

The cargo doors are opening to the inside, so you don't see the doors from the outside.
This means that i don't have to put cargo doors on my plane.

The catering truck comes to the front passenger door on the right side of the plane, and passengers are boarding on the left side.
So now i know what i have to do with my plane.

Part 18 is the section between cockpit and passenger area.

I use a different type of scalpel.
I use this one to remove the number 18 and the round next to is.
With this type you don't cut, but smooth out the surface.


The piece is in place.
Now here is problem number one. If i put this piece in like it is now,
the cockpit wouldn't have any light.
So this is what i plan to do. I make a door so the light also comes inside
the cockpit.

The plexiglass that you see, is the same that i'm going to use to make the
passenger floor.
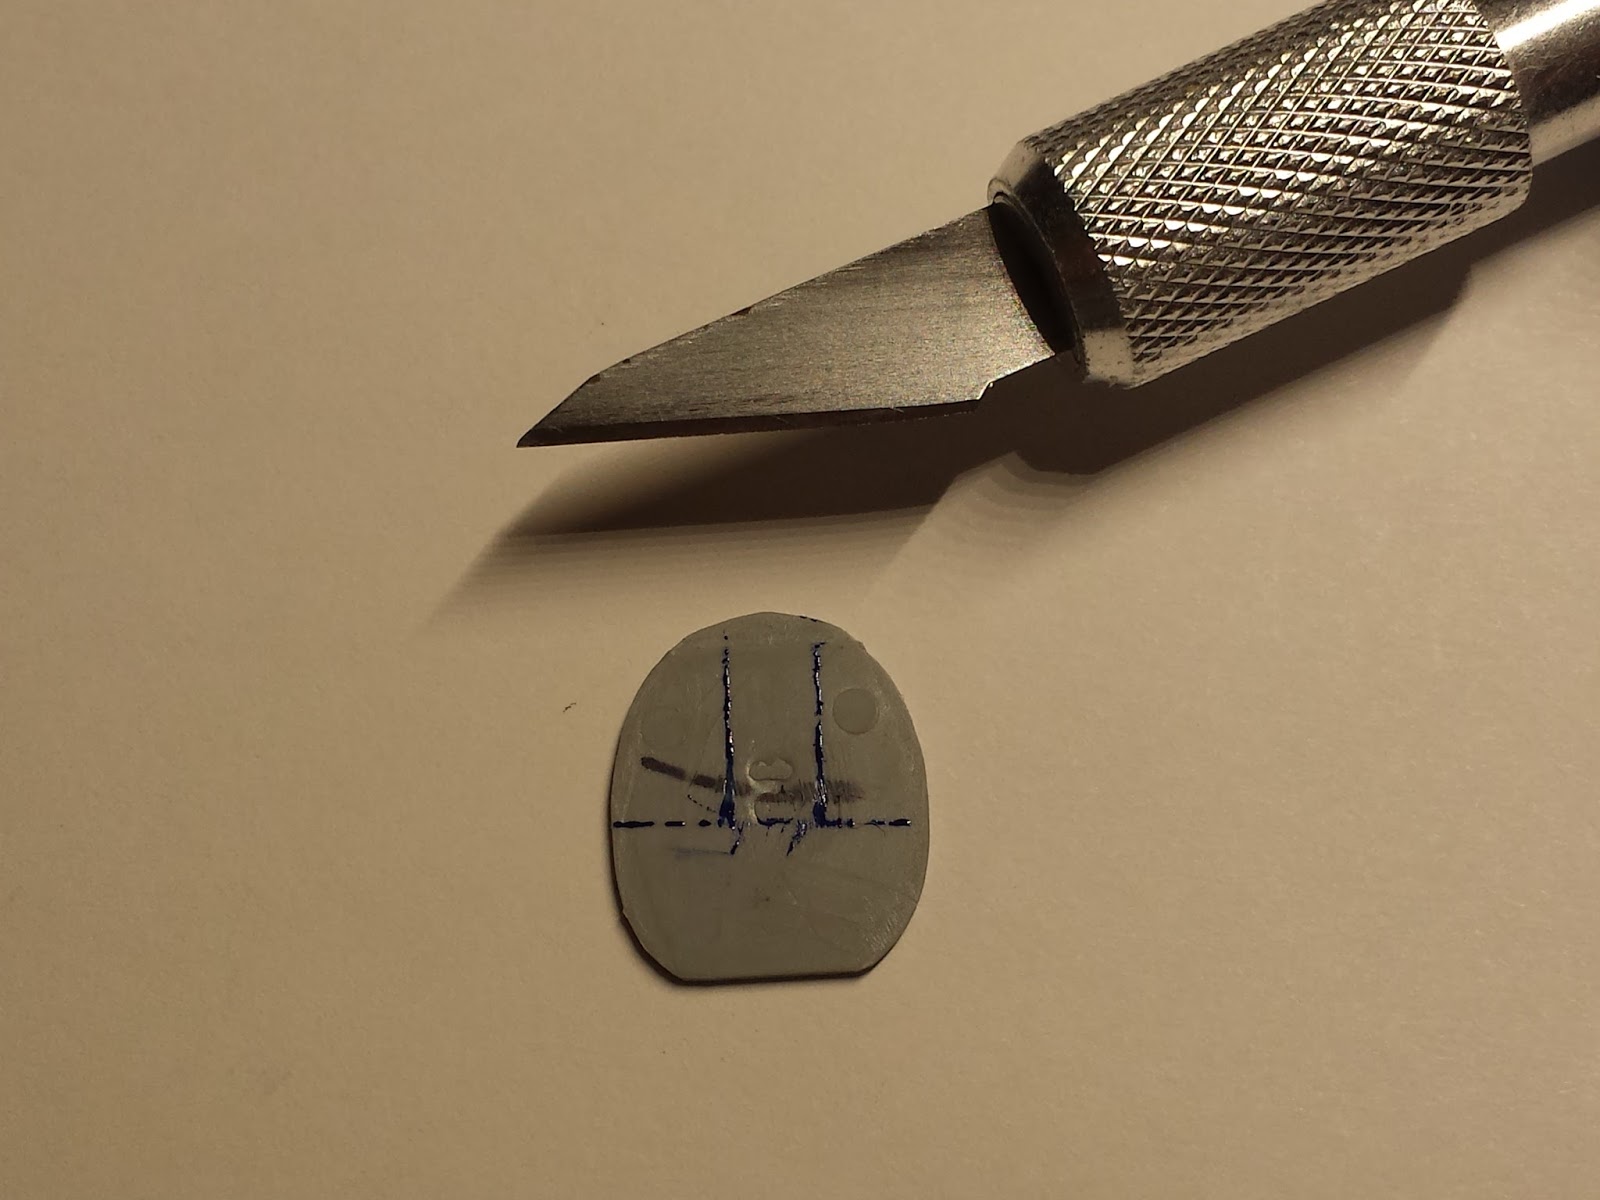
Now i use a small piece to see where the cockpit door has to come.


Now i use the scalpel to make the door opening, i have to cut on the blue lines.
REMEMBER !!
Be very careful if you do this, the piece is small but very thick,
and not easy to handle, you can cut easily in to your fingers !!!


This is how it looks.
I'm happy with the result !!

To make the passenger floor out of the plexiglass i use first a piece of cardboard.
It is easy to cut this and to make a model for the plexiglass.

Take your time to do this. try to fit it with the 2 pieces on each other,
again and again and again, just to fit it right.


The card board has the right size, the fuselage can close without a problem.
Now i have to make the piece in plexiglass.

For this job i use the Dremel. it can cut the plastic easy and you can
put an other disc on it to sand the piece.

It's not easy.
Take your time for this, make sure that you also make the front and back
under a angle, because the fuselage is round. Just so it fits better.


The floor is done, time for the doors.

I now know where they load the plane (in the front) so i have to close
the back passenger doors.
Using the nail clipper to cut the doors and the scalpel to smooth the piece.

The doors on both sides are in place.


Okay, everything is done. Now it is time to finish the inside;
For this job i use PLASTO from Revell. It's is used to make area's on the
model clean. The line where the fuselage comes together.
After sanding you don't see any line anymore.
Now i use it fill up the open space between the model fuselage and
the passenger floor, so the light stay in the two area's.

It is not necessary to sand the PLASTO because you won't see it
after the pieces are glued together.

Now i make the cockpit floor. Small and probably you won't see it,
but i just liked to make it ...

Under the passenger floor i put some weight, just to make sure
that when the plane is assembled the weight of the wings won't tip over the plane.
It will stay on all wheels now.
After this, i'll paint the whole plane on the inside black, it is used as a base coat.

Everything is painted black.


The engine blades are done. Now the engine caps.

Cutting them of with the nail clipper and smoothing them with the scalpel.

The pieces are now done and ready to glue them together.

Because the 2 caps are going to be glued together, there is not
enough space between them to paint them.
So i do this before gluing.

Using a small brush from Revell and aluminum paint.


The middel section doesn't need to be done because you won't see it.
REMEMBER !!
Try not to paint the connection parts,
because the glue won't stick on the piece if there is paint on it. If it would be
the case, then you better use some sandpaper to softly clean them.

When the pieces are painted you can glue them together.
Also using the Revell glue and some clothespins for fixing.


The two engines are done and ready to assemble them on the wings.
The fuselage
Here starts the real challenge. I have to make a extra piece that will
divide the interior in two.
The passenger area and the cargo area.
The passenger area will be with white light and the cargo area with red lights.
Also i have to see witch doors have to be open, and how the cargo area looks like.
I was searching on the web for some answers.
This is what i found.

The cargo doors are opening to the inside, so you don't see the doors from the outside.
This means that i don't have to put cargo doors on my plane.

The catering truck comes to the front passenger door on the right side of the plane, and passengers are boarding on the left side.
So now i know what i have to do with my plane.

Part 18 is the section between cockpit and passenger area.

I use a different type of scalpel.
I use this one to remove the number 18 and the round next to is.
With this type you don't cut, but smooth out the surface.


The piece is in place.
Now here is problem number one. If i put this piece in like it is now,
the cockpit wouldn't have any light.
So this is what i plan to do. I make a door so the light also comes inside
the cockpit.

The plexiglass that you see, is the same that i'm going to use to make the
passenger floor.
Now i use a small piece to see where the cockpit door has to come.

Now i use the scalpel to make the door opening, i have to cut on the blue lines.
REMEMBER !!
Be very careful if you do this, the piece is small but very thick,
and not easy to handle, you can cut easily in to your fingers !!!


This is how it looks.
I'm happy with the result !!

To make the passenger floor out of the plexiglass i use first a piece of cardboard.
It is easy to cut this and to make a model for the plexiglass.

Take your time to do this. try to fit it with the 2 pieces on each other,
again and again and again, just to fit it right.


The card board has the right size, the fuselage can close without a problem.
Now i have to make the piece in plexiglass.

For this job i use the Dremel. it can cut the plastic easy and you can
put an other disc on it to sand the piece.

It's not easy.
Take your time for this, make sure that you also make the front and back
under a angle, because the fuselage is round. Just so it fits better.


I now know where they load the plane (in the front) so i have to close
the back passenger doors.
Using the nail clipper to cut the doors and the scalpel to smooth the piece.


Okay, everything is done. Now it is time to finish the inside;
For this job i use PLASTO from Revell. It's is used to make area's on the
model clean. The line where the fuselage comes together.
After sanding you don't see any line anymore.
Now i use it fill up the open space between the model fuselage and
the passenger floor, so the light stay in the two area's.

It is not necessary to sand the PLASTO because you won't see it
after the pieces are glued together.

Now i make the cockpit floor. Small and probably you won't see it,
but i just liked to make it ...

Under the passenger floor i put some weight, just to make sure
that when the plane is assembled the weight of the wings won't tip over the plane.
It will stay on all wheels now.
After this, i'll paint the whole plane on the inside black, it is used as a base coat.

Everything is painted black.
Geen opmerkingen:
Een reactie posten